
Using ComTekk SINAD PRO
1. Running ComTekk SINAD
First-time users must enter their user registration information to enable the software. This will be sent via email after purchase is made.
Once SINAD PRO has been successfully installed, you may simply double-click the SINAD PRO desktop icon or Click the Windows Start menu, then Programs, choose the ComTekk folder, then SINAD PRO.
While SINAD PRO is loading, the Splash screen will be displayed for a few seconds and will close automatically.
To control SINAD PRO:
- Click "START" button to start or stop data acquisition. The green light will be extinguished when in the off position.
- Click the "X" button in the upper-right corner of the window to close the application completely.
Please note that if you have more than one audio device installed, be sure to select the appropriate recording device.
Continue on to Section 2 below for detailed description of the Menus and Toolbar...
2. The SINAD PRO Controls and Indicators
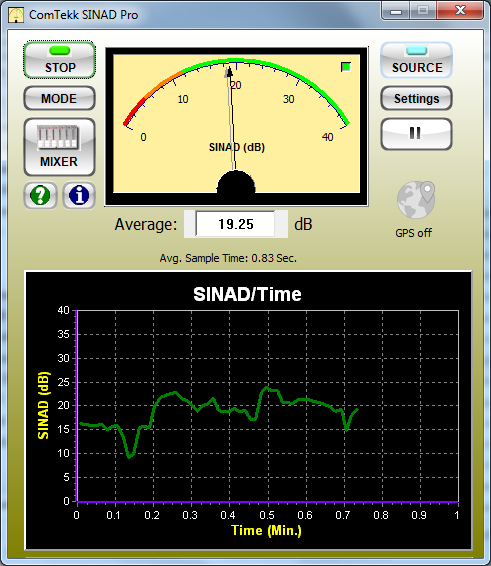
Controls:
1. START - Start / Stop data acquisition
2. SOURCE - Enable / disable 1KHz tone generator
3. Pause - Temporarily stops data acquisition, continues when clicked again
4. MODE - Cycles through the various measurements: SINAD, SNR, THD, THS+N
5. MIXER - Opens the Windows Mixer control panel for sound device input/output settings.
6. Settings - Opens the program settings/preferences screen.
7. ![]() - Help button, opens the online User Manual (this document)
- Help button, opens the online User Manual (this document)
8. ![]() - Opens the "About" screen and Registration option
- Opens the "About" screen and Registration option
9. GPS - Indicates status of GPS location service
Indicators:
![]()
1. Analog Meter - Analog meter display gives an easy-to-read indication of measurement. The green light in the upper-right corner of the meter will light whenever the minimum "acceptable" threshold is reached.
![]()
2. Digital meter - Situated just below the analog meter, shows the averaged value. The number of samples averaged will determine how often this indicator updates.
3. Avg Sample Time - Displays the elapsed time for each group of samples being averaged.
4. Graph Display - Shows a real-time moving graph of the measured value over time. Each time the START button is pressed, the graph will clear and being from zero seconds. When the elapsed time exceeds one minute, the graph will begin scrolling and continue until the STOP button is pressed (or remote Stop command is received).
3. Windows Mixer Control Panel
Windows Volume Control (Playback):
Depending on your particular computer's configuration, it may also be necessary to adjust individual WinVolume levels such as "Wave" or "Wavetable." Be sure the master and wave volumes are not muted. This will prevent SINAD from producing a 1kHz tone.
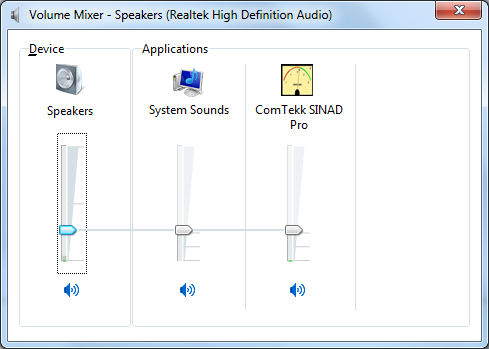
NOTE: Windows Volume Control dictates the maximum output of the sound device. The ComTekk SINAD Source generator output level control is relative to the selected Windows Volume. In other words, the Windows mixer settings take precedence over applications such as ComTekk.
The Windows Volume Recording controls affect sound device INPUTS, such as LINE , AUX or MICrophone. To access Recording controls, open Windows Volume Control from ComTekk, or right-click on the speaker icon in your system tray. Select "Recording Devices " from the menu.
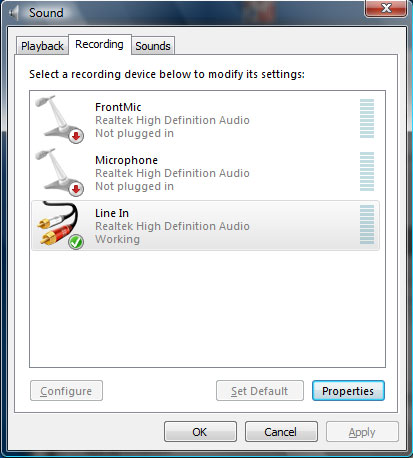
Select the recording device you are using, then click "Properties." Select the "Levels" tab. Settings will be saved on closing this window.

4. Test Equipment Setup
To measure SINAD, THD, or SNR the following minimum equipment is required:
- Receiver to be tested
- RF Signal Generator with AM/FM modulator
- Personal computer running SINAD PRO. (see system requirements)
Connections (see diagram below):
Connect the RF signal generator RF output to the antenna jack of receiver to be tested using 50-ohm coaxial cable with appropriate connectors.
Connect the audio or speaker output of the receiver to the sound card input jack. While generally not required, a DC-blocking capacitor (0.1~4.7uF) is recommended as a minimum for protection of computer. ComTekk's Sound Card Isolators provide full isolation via 600-ohm transformers and over-voltage protection.
If your RF signal source does not have an internal audio (1KHz) tone generator, connect the sound card output to the RF generator's external modulation input jack. SINAD PRO is capable of generating this tone, provided your sound card has full-duplex capability. Some older models cannot send and receive at the same time. Full-duplex cards can take an input signal, digitize it, and simultaneously convert the digital audio back to analog and play it out through the speakers.
Set the RF generator to the same frequency as the receiver. Follow the instructions in the radio's service manual for setting modulation, AF & RF levels, etc. Be sure not to over-modulate the RF carrier which will cause distortion and erronious readings.

Congratulations! You are now ready to begin testing your receiver.
5. Program Settings

General:
1. Audio Input Device - Use this drop-down to select the audio input device where your receiver's audio output is connected. NOTE: To refresh the list, close the settings window then open it again.
2. Meter Smoothing - enables a smoothing algorithm to slow the analog meter's response, reducing 'jerky' movements making it easier to read.
3. Debug Window - Shows the program's background activity, useful when testing TCP controls, a GPS device or troubleshooting issues.
Tone Source :
1. Audio Output Device - Use this drop-down to select the audio output device where the 1kHz tone will be presented. NOTE: To refresh the list, close the settings window then open it again.
2. Frequency - If your sound card is off frequency, use this control to fine tune the 1kHz tone. Be sure to use a calibrated instrument when adjusting.
3. Gen Level - Used to adjust the 1kHz tone output level
TCP Data Stream :
1. Enable Server - When checked, the TCP server is enabled and waits for a client connection. When START is clicked or the Start command is received, averaged measurement data will be sent to the chosen TCP port until Stopped. Control protocol details are available on request through Comtekk Support.
2. Port - Select the desired TCP/IP communications port. Default is 6001. The internal server will listen for commands and send data on this port.
Data Logging :
1. Log to CSV File - This will enable data logging to a CSV formatted text file, compatible with Microsoft Excel and similar programs. A new file will be created each time the START button is pressed.
2. File Name Prefix - Chose a custom prefix if desired for file names. The date and time will be added automatically to the file name.
3. Logs Folder - Location where log files will be saved. Click "Change Folder" to selecte a different file location.
4. Log Location Sensor Data - Add GPS coordinates to the log file. Fields will be blank if Windows Location Service is not enabled and accessible. Disabled by default. NOTE: When enable and active, will be indicated by the GPS icon on the main screen.
5. Add mS to Time Stamp - If checked, a decimal milliseconds value will be added to the timestamp for each measurement for higher accuracy if needed. Disabled by default.
6. Browse Logs - Opens the folder containing your log files in Windows File Explorer.
To close the Settings window, click the "Done" button. This will save any changes you have made.
Next: Making Direct Measurements