
User Settings & Preferences
4. General / Security preferences
To open the settings window, select Settings from the Tools menu, or press Ctrl+S. If security has been enabled, you will have to enter a password to change settings or presets.
1. Audio Settings Tab
Click the Audio tab to view/change.
1. TX Audio panel:
1.0 TX Audio Device - Select the transmit audio device. If none are available, an error message will appear on startup. Be sure sound card input/output cables are connected before starting program.
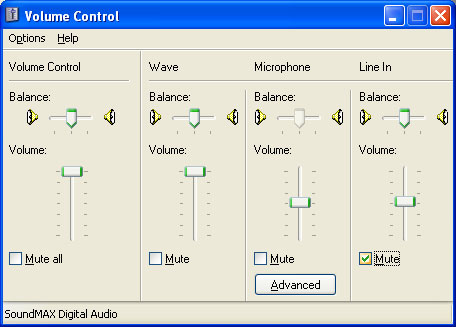
1.1 Output (TX) Setup - click the Audio Out button to open the Windows Playback control panel (7/10) or Volume Control (XP):
Windows Volume Control (Output): [Windows 95, 98, NT, XP, 2000, ME] - scroll down for Windows 7 / 10.
This screen controls the transmit audio (output). Audio INPUTS are set up in the Recording Control (see below).
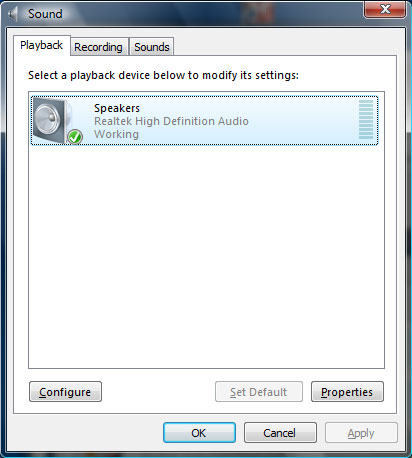
Windows 7/10 Playback [transmit audio] settings, also accessible from Windows Control Panel. Select playback device for transmit audio and click Set Default to save.
1.1.2 Click "Properties" then select the "Levels" tab for playback mixer controls. Normally it won't be necessary to change these settings, however, if having difficulty with Microphone transmit audio, you may need to adjust the level or mute button setting:
1.2 Vol Mixer Button - only appears in Windows 7/Vista or later versions. Opens the Windows Volume Mixer. These are the master output volume controls for Device and SELCAL application. If transmit audio is too low, it may be necessary to increase the output device (usually "Speakers") master volume level.
1.3 Master TX Level - This setting controls the overall transmit (output) audio level for ComTekk SELCAL. This level will be used by the software every time a transmission is initiated, and overrides Windows user setting if different.
1.4 SELCAL Level - Controls the level of SELCAL tone generator only. It will not affect microphone or other audio devices.

2. Mic Audio panel
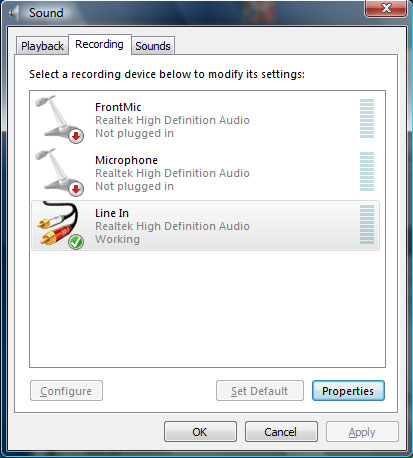
2.1 Input (Mic) Setup - Click the Audio In button to open Windows Recording control panel. Normally it won't be necessary to change these settings.
2.1.1In later versions of Windows (Vista/7) the microphone input from a different sound card or device can be routed to the audio device being used for transmit (TX). To accomplish this, select the recording (input) device, then click Properties.
In the Properties window, select the Listen tab. Under "Playback through this device" choose the appropriate output device being used for transmit audio. Click Apply or OK to save setting.
2.2 VU Meter - displays relative sound level at selected default recording device. Note this is not the same level that will be sent to transmit audio line. See item 1.1.2 above.
2. Transmit Control Settings
Click the Xmit Control tab to view/change.
1. TX Control Mode
1.1 VOX Mode (Voice Operated Transmit) - To use this mode, transmitter must be set to VOX mode also. Allows CALL and TALK console buttons to function when no COM port is open. PTT Control Port will be disabled in this mode and COM indicator on console screen will be off (gray).
2. TX Control Port settings
2.1 PTT Control Port - Select serial (RS-232) COM port for PTT control. COM ports 1 - 64 are supported. If port selected is unavailable, an error message will appear and the selection will return to <OFF> position. Once a valid port has been selected, it will be held open by ComTekk SELCAL and will not be available for use by other programs.
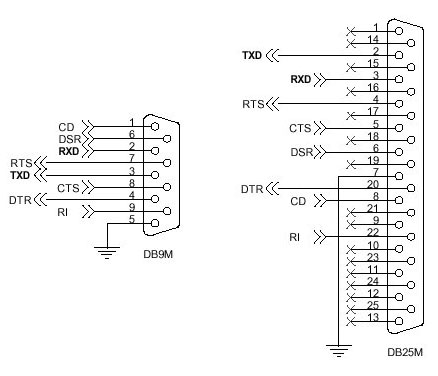
A standard 9-pin, 25-pin serial port or USB to serial adaptor may be used. The ComTekk Radio Interface (USB) is recommended. If a USB adaptor is used, it must be installed before attempting to configure ComTekk SELCAL. COM-port assignments may be found in the Windows Device Manager.2.2 PTT Line - Serail control line (pin) to be used for PTT. NOTE: Voltage will be +/- 12V on an RS-232 port or 5V on a USB adaptor. On a DB-9 connector, DTR is pin 4, RTS is pin 7, and ground is on pin 5. See connector pinouts below.
6. TX Audio Delay - this is the time between PTT activation and beginning of audio signals (does not apply to voice, only tone signals). For most applications, this setting is usually not critical.
7. TX Hold Time - Keeps the transmitter keyed for the selected time period after tone signals have ended. Not critical for most applications.
8. Finally, test your settings with the "Test PTT" button. If everything is set up and wired correctly, this button will momentarily key the transmitter while pressed.
RS-232 Pinouts:
3. Radio Control
Click the Radio Control tab to view/change. This feature introduced in Ver. 4.0 enables automatic mode change (AM/SSB) on certain radios.
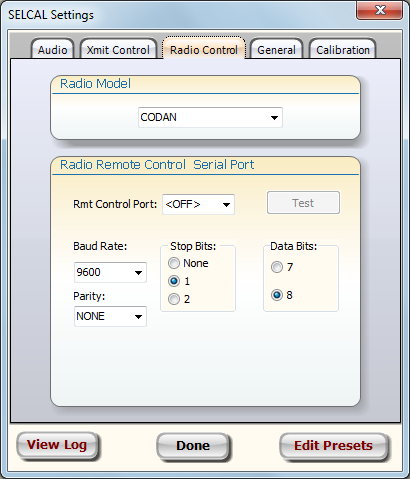
Radio Model - At this time only CODAN radio control is supported. Other models may be added in the future.
Rmt Control Port - Select the COM port connected to the radio's serial control interface.
Baud Rate, Parity, Stop Bits, Data Bits - Set as needed to match your radio's settings.
Test button - When enabled, click to test the mode change function. Click Done to save changes and close the Settings window.
4. General Preferences
Click the General tab to view/change.
1. Options
1.1 Save code on exit - saves last SELCAL code displayed on exit. This code will appear next time program is launched.
1.2 Clear after SEND - clears the code display after the CALL button or a preset button is pressed.
1.3 Send code twice - when CALL or preset button is activated, SELCAL encoder will transmit the tone code twice to help ensure it is received. There is a 2-second delay inserted between tone pairs.
1.4 Hide Preset Code - when checked, the SELCAL code will NOT be displayed when a preset button is activated. This feature is provided to help keep codes confidential.
1.5 Start with Windows - determines whether program will start up automatically when Windows is booted.
1.6 Confirm Exit - causes a dialog box to appear confirming you want to exit the program before closing.
2. Security - These options control user access to certain features and controls.
2.1 Pasword Protect Settings - Checking this box will enable the other two options and require user to enter a password to access program settings. This also enables the Change password button.
2.2 Require Password to Exit - Causes the password dialog to open before exiting the program
2.3 Change/Set Password - Click the Change button to enable editing of the password. Enter password carefully. Password recovery will require a Tech Support call! To save new password, click Set.
Note: All settings are saved upon exiting CTSelcal.
5. Sound Card Calibration
Click the Calibration tab to view/change.
DO NOT use the calibration with ComTekk CRF Radio Interface box. This interface has a highly accurate temperature-compensated crystal oscillator (TCXO) and does not require calibration.
Computer sound cards vary greatly in quality and design. They have their own time-base which controls the A/D and D/A sampling rate, which in turn directly affects the frequency. The calibration routine allows for compensation for timebase error, thus allowing accurate frequency synthesis.
This auto-calibration does not require any specialized equipment. However, a FULL-DUPLEX sound card is required. This means the card has the ability to play and record simultaneously. Nearly all newer sound cards are full duplex.
NOTE: Calibration need only be performed once for a particular sound card.
AUTO-CALIBRATION INSTRUCTIONS:
1. Select the INPUT (Mic or Line) for the sound card you will be using to transmit. Be sure the AutoCal box is checked. Loop the sound card OUTPUT back to its INPUT. Three different ways to do this are presented below:

Option1: Use a 1/8" stereo cable to connect Line/Speaker OUT to Line/Aux/Mic IN.
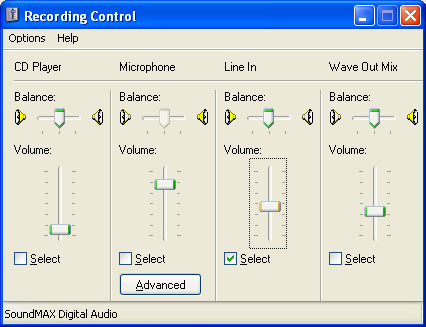
Option 2: Open the Windows Recording Control panel using the Audio In button. Select the "Wave Out Mix" (or similar) checkbox to create an internal loopback. Not all sound card drivers have this option. If available, it negates the need for an external connection.
Option 3: Audio pickup - If you have a microphone connected to (or internal to) your computer, open the Windows Recording Control panel using the Audio In button. Select the "Microphone" checkbox to enable the MIC input. Place the microphone directly in front of a computer speaker so it will pick up the sound from the tone generator. Take care not to get it too close which will generate feedback, voiding the calibration.
2. Once the loopback is established using one of the methods described above, open the ComTekk Settings window, using the toolbar or or select Settings from the File menu. Select the Calibration tab. Click START.
If using speakers and loopback is working, you should hear a very short tone. The Status will change to "Calibrated" and the frequency and calibration factor will be displayed. The VU meter will indicate relative INPUT level. It may be necessary to adjust input or output levels, or the microphone position if using Option 3 for loopback.
The measured frequency should be somewhere close to 1,000 Hz. If it is closer to 2,000 Hz, the volume is most likely too high. Lower either the playback or recording level in the mixer, click "Reset" and run the calibration again.
If the calibration tone was not detected, this will be indicated on the "Status" line. Make adjustments and click START to try again. It may be necessary to attempt a different loopback method if you can't get it to work after several tries.
Note: All settings are saved upon exit.
6. View Log File
In the Settings window, click the View Log button. The CSV file type must be registered in Windows for this feature to function [detailed instructions].
Tip: If you don't have Microsoft Excel, CSView is available as a free download.
The log file is a text file, saved in .CSV (Comma Separated Value) format, which can easily be viewed and edited with Microsoft Excel, OpenOffice, or any text editor, such as Notepad or WordPad.
Each log entry is saved with SELCAL Code, Date, and Time in 24-hour format.
IMPORTANT NOTE: When the log file is open for viewing by another program such as Excel, CTSelcal cannot update the file. Therefore, if a transmission is made while viewing file and an attempt is made by the program to update the log file, an error will result, and log entry will be lost.
7. Edit SELCAL Preset Buttons
In the Settings window, click the Edit Presets button. This will open the Edit SELCAL Presets dialog:
1. Number of Preset Buttons - Use the drop-down list to select 16, 32, 48 or 64 presets. This setting controls the number of preset entries visible for editing as well as the number of buttons. The preset button panel is resized accordingly. Buttons will be updated when edit window is closed. Buttons are numbered left to right starting from top row, in each of 4 panels.
2. Editing presets - Each row corresponds to button indicated in the left Preset column. To edit a button, click on the appropriate cell (you may have to click twice the first time). Use mouse or arrow keys to navigate between fields. Tab key can be used to move to next field. In Version 3.1 and later, the number of aircraft entries is unlimited, but only the first 64 can be used for preset buttons. An aircraft directory search feature has been added for convenient access to all entries.
The first editable column Aircraft is the name or label that will appear on the button. Maximum is 8 characters and may include upper/lower case, numbers or symbols.
The second column CODE is the actual 4-character SELCAL code. Entry will be validated once 4 characters have been entered. An invalid character will result in error and the entry will be cleared. CODE entries will be saved in upper-case, even if lower-case characters are input.
The Btn Color column determines the button highlight color. Choose a color from the dropdown box, or creat your own custom colors. The color's integer (numeric) value will be saved in the cell.
Last column on right is for comments or notes (not required).
Delete button will clear all contents of highlighted row.
Click Add to add a new entry to the end of list
The Insert button will add a new entry above the currently highlighted row.
Save and Close button will save all presets to a XML file in the application data folder and close the editing window. This is the only way to save your changes.
Close button will close the editing window without saving. If changes were made you will be prompted to confirm close without saving changes.