 DispatchSMS

SECTION V. Software Setup
NOTE: Click on red text for more details on highlighted item
CONTENTS
- Install
- Mail Settings
- Test Email
- General Settings
- Message Settings
- Diagnostics
- Group List
- Member List
1. Install DispatchSMS
If you haven't already, install the software and enter registration key if you already have one.
2. Mail Settings Tab
5.1 Email Settings - To utilize the email feature, you must have an email account. Most ISPs provide at least one email account. Note that SSL/TLS, required by most free webmail providers such as Gmail, Yahoo, etc. is not supported at this time, but will be added in a future release. Auto Configure is provided for some of the most common email services. For low-volume users, we recommend setting up a free account at GMX mail, which does not require SSL access: http://www.gmx.com
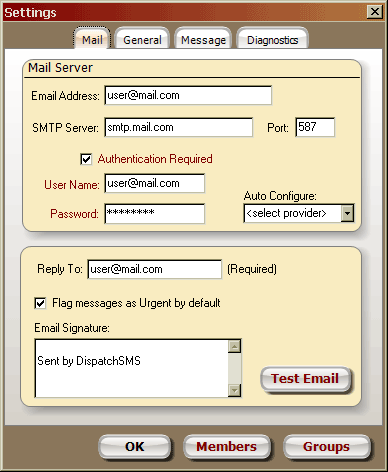
First click the Auto Configure drop-down to see if your provider is listed. Making a selection here will populate the basic settings for that particular provider. A message box will appear, propting you to enter your email address, and account login & password.
NOTE: Be sure POP3 access is enabled for your email account! As a security measure, many web-mail providers have this functionality disabled by default.
Email Address - enter the complete email address for the account you will be using here.
SMTP Server - This is your OUTGOING mail server address, as provided by your email service.
Port - 25 is the standard for outgoing email - do not change unless you know the specific port number.
Most ISPs are now blocking port 25 as an anti-spamming measure - use port 587 as an alternate.Authentication Required - Some ISPs don't require a login/password if you are connected to their network. If this box is checked, you must provide the User Name and Password as well.
Reply To: - (Required) reply email address for all mail messages. Recipients will reply to this address. To see replies, dispatcher should monitor this email address with preferred email client or web browser.
Flag as Urgent - By default, new messages will be marked as "High Priority". Note that some email clients or services will ignore this flag (example GMail).
Signature - The text entered here will be placed at the end of every alert email sent. It should identify the sending agency, contact name/number and may include a short disclaimer.
Note that using a long signature could cause the received message be truncated or split into 2 or more messages when sent to a mobile SMS address - these are usually limited by the carrier to between 140-240 characters total.
3. Test Your Email Settings
6.1 To check your Mail Server settings, click the Test Email button in the Mail tab of the Settings window, which will open the messaging window:
6.2 Enter a recipient's email address for testing (preferrably an account you have immediate access to), then click Send Test Email. Normally the sending process shouldn't take more than half a minute. You can monitor progress in the Activity window. Below is an example of a successful transmission, ending with the message "Connection closed." Any error messages displayed here will aid in troubleshooting your email settings.
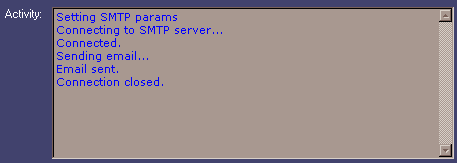
6.2.1Upon successful send, check the Inbox of recipient email address. Depending on the service and software, the test email could appear immediately, or take a few minutes or more.
NOTE: There is no way to control how quickly an email is delivered once it has been sent.
6.2.2Click the Close button when you have finished testing.

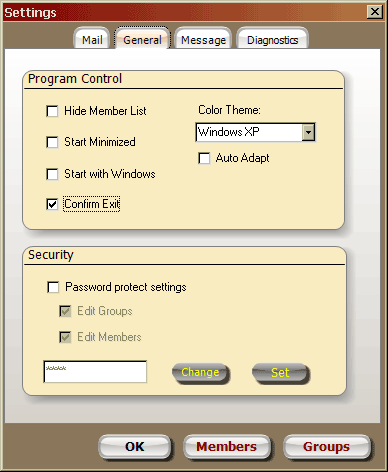
4. General Settings
4.1 Program Control - various program behavior settings
Hide Member List - If checked, this will cause the member list on the main screen to be hidden from view, and inaccessible to the user.
Start Minimized - Causes DispatchSMS to launch in minimized state. The window won't be visible, but you will see it on the task bar. Click the task bar box to restore window.
Start with Windows - Loads DispatchSMS automatically whenever computer is booted.
Confirm Exit - If enabled, this option will cause a dialog box to open when exiting the program asking you to confirm. This can help prevent a user from stopping DispatchSMS accidentally.
Color Theme - Choose from any of the available color themes in the drop-down list. This will only affect the main screen appearence.
Auto Adapt - This will cause the main window color theme to automatically adapt to your Windows color settings.
4.2 Security - When this box is checked, a password will be required to access the Settings window.
Enter your password carefully and keep it in a safe place. Password reset requires contacting Tech Support...
Click the Change button. Enter password in the text box, then click the Set button. Password is case sensitive.
Edit Groups - Require password to access group button editing
Edit Members - Require password to edit members and email addresses
5. Message Tab
5.1 To access the message formatting options, click Configure from the main menu, then click the Message tab. These settings will determine how the text message is presented to receipients.
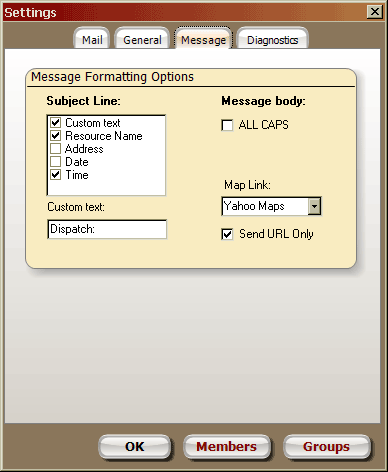
5.1 Subject Line - The message Subject line many include any combination of the items Custom Text, Resource Name, Address, Date and Time. Check the box for each item you wish to appear in the subject text. NOTE: Subject text is included in the total message character count
5.2 Custom Text - Enter word or phrase to appear at the beginning of subject line for each message.
5.3 ALL CAPS - This will cause all Message Text typed to appear in all capital letters.
5.4 Map Link - Select the desired map provider for map links. Available choices are Google Maps, Yahoo Maps, MultiMap/Bing, OpenStreetMap, and Tiny Geocoder. The URL is generated using the free "mapof.it" service.
5.5 Send URL Only - When this option is checked, the street address will NOT be included in the message, only the Map Link.
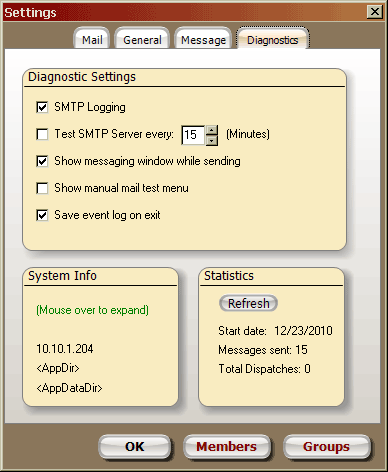
6. Diagnostics
6.1 SMTP Logging - Enable this checkbox to log email activity for troubleshooting. File name is "smtp.log", found in the program folder and may be viewed with Notepad or any text viewer/editor. Note this file can become very large if left active for a long time. For this reason, the SMTP Logging defaults to "OFF" when starting DispatchSMS. For more info, see the Troubleshooting FAQ.
6.2 Save event log on exit - upon exiting DispatchSMS, the contents of the "Activity" box on the messaging window will be saved to the file "mail.log", found in the program folder and may be viewed with Notepad or any text viewer/editor. When this option is enabled, the Dispatch Log status indicator on the main screen will be green.
6.3 Test SMTP Server - Used to periodically test communications with your email server. If the test fails, the Mail Server status indicator on the main screen will turn yellow. If the test is good on the next try, status will return to green.
6.4 Show messaging window while sending - provided as an additional aid for troubleshooting email problems.
6.5 Show manual test menu - Displays a menu for manually stepping through each task when sending a test email. Connect to server, send mail, disconnect. This is provided as a troubleshooting tool.
6.6 System Info is provided for convenience at the bottom of the Diagnostics window.
First is the computer's local IP address. Mouse over <AppDir> or <AppDataDir> to reveal file locations for the application and data folders. Tone-out and Email Lists are contained in the AppDataDir and program log files are stored in the AppDir. The alert log and audio recordings are saved in the folder shown on the Alert Options tab.
6.7 Statistics - program stats
Start date - Date program was first launched, starting date for statistics
Emails sent - Keeps track of the total number of emails sent. This will be number of dispatches multiplied by the number of recipients for each dispatch.
Total Dispatches - Total number of dispatches sent by the software.
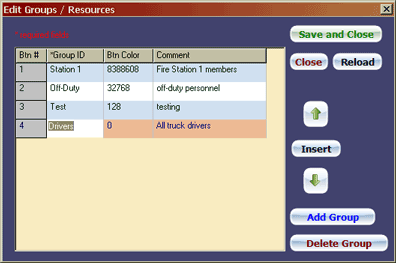
7. Group List
To access the Group List: From the Settings window, click the Groups button, or from the Main Menu, select Manage -> Groups.
To edit an existing entry, click to select the row, then click again to edit the field. Use the Tab key or mouse to move cursor to next field. To delete an entry, click on it (single-click) to highlight that entry, then click the Delete Group button. To select a different color for the button, use the color selector drop-down in Btn Color column (default button color is light gray). Selected color will be saved as a decimal number value. Click on the number to see the corresponding color. The Group ID text will be displayed on the button. There is no 'sort' function on this list.
NOTES: Buttons will be created in the order listed on this screen (by Btn #). Group IDs should not contain spaces or commas.
7.1 To add a new button, click the Add Group button. A new entry will be at the end of the list.
Use the Insert button to add a new row above the highlighted entry. The Up and Down arrows will move the highlited row up or down by one position.
7.2 When finished editing, click Save and Close. You may also close the window using the Close button, but changes will not be saved until Save and Close is clicked.
7.3 The Reload button will restore list to the last saved state. Any changes made thereafter will be lost.
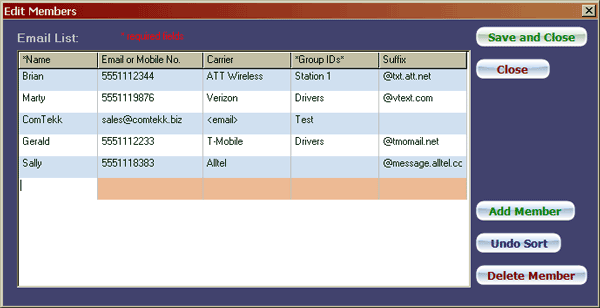
8. Email List
To access the Email List: From the Settings window, click the Members button, or from the Main Menu, select Manage -> Members.
To edit an existing entry, click to select the row, then click again to edit the field (the Suffix column cannot be edited). To sort the entries, click on the column heading, for example to sort entries by group, click on the Group ID heading. Click again to invert sort order. The Undo Sort button will return entries to their original order. To delete an entry, click on it (single-click) to highlight that entry, then click the Delete Member button.
8.1 To add a new entry, click the Add Member button. This entry will be inserted into the next available empty row, or a new row will be added at the end of the list. Use the Tab key or mouse to move cursor to next field.
Name - member's name, as you want it to appear in the Member List.
Email or Mobile No. - Normal email address, OR 10-digit mobile phone number (enter the numbers only as shown above, most carriers require 10 digits. No spaces, dashes, etc.).
Be sure to have all SMS recipients check their calling plan allowances before using this feature. Most wireless carriers charge extra for text/SMS messaging!
Carrier - Select <email> if using a complete email address, otherwise choose a cellular carrier if using SMS. The appropriate email suffix will be shown in the right-hand column. DO NOT select a carrier if you have entered a complete email address. This will
If your carrier is not listed in the drop-down, most SMS gateways may be found on one of these lists:
http://www.mutube.com/projects/open-email-to-sms/gateway-list/
http://en.wikipedia.org/wiki/List_of_SMS_gateways
Group IDs - If member of a group or groups, Group ID(s) must exactly match the Group ID name(s) in the Group List above. Multiple Group IDs may be entered and must be separated by a comma and/or space.
Be sure each Group ID is unique and not contained in part of another. For example:
Station-7
Station-71This will cause Station-71 to also receive calls for Station-7. Instead, use Station-07 as the ID.
8.2 Save alert lists:
Click Save and Close once you are satisfied all entries are correct. This is the only way to save your changes.
8.3 To close without saving, click Close.
Congratulations! You should now be ready to start using DispatchSMS. Testing is highly recommended to ensure everything is working properly and all members are able to receive their messages.
Next section: Using DispatchSMS